浪潮2u服务器安装RAID管理软件和修复磁盘

磁盘操作
首先是安装软件
wget https://docs.broadcom.com/docs-and-downloads/raid-controllers/raid-controllers-common-files/1-01-10_StorCLI.zip

unzip 1-01-10_StorCLI.zip

cd Linux\ OS/

unzip MR_SAS_CLI_StorCLI-1.01.10.zip

rpm -ivh storcli-1.01.10-1.noarch.rpm

ln -s /opt/MegaRAID/storcli/storcli64 /bin/storcli64

sudo yum install ncurses-compat-libs
查看阵列卡信息:
storcli64 show
Status Code = 0
Status = Success
Description = None

Number of Controllers = 1
Host Name = localhost.localdomain
Operating System  = Linux4.18.0-348.7.1.el8_5.x86_64

System Overview :
===============

--------------------------------------------------------------
Ctl Model Ports PDs DGs DNOpt VDs VNOpt BBU  sPR DS  EHS ASOs
--------------------------------------------------------------
  0 2GB       8   8   6     0   6     0 Msng On  1&2 Y      3
--------------------------------------------------------------

Ctl=Controller Index|DNOpt=DG NotOptimal|VNOpt=VD NotOptimal|Opt=Optimal
Msng=Missing|Fld=Failed|Dgd=Degraded|NdAtn=Need Attention|Unkwn=Unknown
sPR=Scheduled Patrol Read|DS=DimmerSwitch|EHS=Emergency Hot Spare
ASOs=Advanced Software Options|N=None
输入命令查看磁盘信息:
storcli64 /c0/vall show
内容如下,可以看到每块磁盘的状态:
Controller = 0
Status = Success
Description = None


Virtual Drives :
==============

-----------------------------------------------------------
DG/VD TYPE  State Access Consist Cache sCC       Size Name
-----------------------------------------------------------
2/0   RAID1 Optl  RW     Yes     RWTD  -     931.0 GB
3/1   RAID0 Optl  RW     Yes     RWTD  -     5.457 TB
5/2   RAID0 Optl  RW     Yes     RWTD  -     5.457 TB
4/3   RAID0 Optl  RW     Yes     RWTD  -     5.457 TB
0/5   RAID0 Optl  RW     Yes     RWTD  -   446.625 GB
1/6   RAID0 Optl  RW     Yes     RWTD  -   446.625 GB
-----------------------------------------------------------

Cac=CacheCade|Rec=Recovery|OfLn=OffLine|Pdgd=Partially Degraded|Dgrd=Degraded
Optl=Optimal|RO=Read Only|RW=Read Write|B=Blocked|Consist=Consistent|
R=Read Ahead Always|NR=No Read Ahead|WB=WriteBack|AWB=Always WriteBack|
查看阵列信息:
storcli64 /c0/eall/sall show
Controller = 0
Status = Success
Description = Show Drive Information Succeeded.


Drive Information :
=================

----------------------------------------------------------------------------
EID:Slt DID State DG       Size Intf Med SED PI SeSz Model               Sp
----------------------------------------------------------------------------
8:0      15 Onln   2   931.0 GB SATA HDD N   N  512B ST1000NM0055-1V410C U
8:1      16 Onln   2   931.0 GB SATA HDD N   N  512B ST1000NM0055-1V410C U
8:2      13 Onln   0 446.625 GB SATA SSD N   N  512B INTEL SSDSC2KG480G7 U
8:3      14 Onln   1 446.625 GB SATA SSD N   N  512B INTEL SSDSC2KG480G7 U
8:4      12 Onln   3   5.457 TB SAS  HDD N   N  512B ST6000NM0095        U
8:5      11 Onln   5   5.457 TB SAS  HDD N   N  512B ST6000NM0095        U
8:6       9 Onln   4   5.457 TB SAS  HDD N   N  512B ST6000NM0095        U
8:7      10 UBad   -   5.457 TB SAS  HDD N   N  512B ST6000NM0095        U
----------------------------------------------------------------------------

EID-Enclosure Device ID|Slt-Slot No.|DID-Device ID|DG-Drive Group|
Intf-Interface|Med-Media Type|SED-Self Encryptive Drive|PI-Protection Info|
详细阵列情况:
storcli64 /c0/dall show
--------------------------------------------------------------------------
DG Arr Row EID:Slot DID Type  State BT       Size PDC  PI SED DS3  FSpace
--------------------------------------------------------------------------
 0 -   -   -        -   RAID0 Optl  N  446.625 GB dflt N  N   none N
 0 0   -   -        -   RAID0 Optl  N  446.625 GB dflt N  N   none N
 0 0   0   8:2      13  DRIVE Onln  N  446.625 GB dflt N  N   none -
 1 -   -   -        -   RAID0 Optl  N  446.625 GB dflt N  N   none N
 1 0   -   -        -   RAID0 Optl  N  446.625 GB dflt N  N   none N
 1 0   0   8:3      14  DRIVE Onln  N  446.625 GB dflt N  N   none -
 2 -   -   -        -   RAID1 Optl  N    931.0 GB dsbl N  N   none N
 2 0   -   -        -   RAID1 Optl  N    931.0 GB dsbl N  N   none N
 2 0   0   8:0      15  DRIVE Onln  N    931.0 GB dsbl N  N   none -
 2 0   1   8:1      16  DRIVE Onln  N    931.0 GB dsbl N  N   none -
 3 -   -   -        -   RAID0 Optl  N    5.457 TB dsbl N  N   none N
 3 0   -   -        -   RAID0 Optl  N    5.457 TB dsbl N  N   none N
 3 0   0   8:4      12  DRIVE Onln  Y    5.457 TB dsbl N  N   none -
 4 -   -   -        -   RAID0 Optl  N    5.457 TB dsbl N  N   none N
 4 0   -   -        -   RAID0 Optl  N    5.457 TB dsbl N  N   none N
 4 0   0   8:6      9   DRIVE Onln  N    5.457 TB dsbl N  N   none -
 5 -   -   -        -   RAID0 Optl  N    5.457 TB dflt N  N   none N
 5 0   -   -        -   RAID0 Optl  N    5.457 TB dflt N  N   none N
 5 0   0   8:5      11  DRIVE Onln  N    5.457 TB dflt N  N   none -
--------------------------------------------------------------------------

UID=Unique Identification Number | DG=Disk Group Index
Arr=Array Index|Row=Row Index|EID=Enclosure Device ID
DID=Device ID|Type=Drive Type|BT=Background Task Active|PDC=PD Cache
PI=Protection Info|SED=Self Encrypting Drive|DS3=Dimmer Switch 3
查看挂载情况:
lsblk
NAME          MAJ:MIN RM   SIZE RO TYPE MOUNTPOINT
sda             8:0    0   931G  0 disk
└─sda2          8:2    0 930.5G  0 part /video
sdb             8:16   0   5.5T  0 disk
└─sdb1          8:17   0   5.5T  0 part /data
sdc             8:32   0   5.5T  0 disk
└─sdc1          8:33   0   5.5T  0 part /oldwww
sdd             8:48   0 446.6G  0 disk
├─sdd1          8:49   0    16M  0 part
├─sdd2          8:50   0    30G  0 part
├─sdd3          8:51   0    30G  0 part
├─sdd4          8:52   0    30G  0 part
├─sdd5          8:53   0    30G  0 part
├─sdd6          8:54   0   600M  0 part /boot/efi
├─sdd7          8:55   0     1G  0 part /boot
└─sdd8          8:56   0   325G  0 part
  ├─cl00-root 253:0    0    70G  0 lvm  /
  ├─cl00-swap 253:1    0  31.3G  0 lvm  [SWAP]
  └─cl00-home 253:2    0 223.7G  0 lvm  /home
sde             8:64   0 446.6G  0 disk
└─sde1          8:65   0 446.6G  0 part
  └─cl-root   253:3    0    70G  0 lvm
[root@localhost Linux OS]# storcli64 /c0/dall show
Controller = 0
Status = Success
Description = Show Diskgroup Succeeded
根据您的 RAID 配置信息,磁盘 8:5(DID=11) 确实未被加入任何磁盘组(**<font style="color:rgb(64, 64, 64);background-color:rgb(236, 236, 236);">DG=-</font>**),而其他磁盘(如 8:0、8:1、8:2 等)已配置为 RAID0/RAID1 虚拟磁盘。以下是针对 **8:5 磁盘(有数据但未加入 RAID 组)的安全挂载方案:
一、确认磁盘 8:5 未绑定到任何虚拟磁盘
从输出中可以看到,所有虚拟磁盘(DG0-DG4)均未包含 8:5 磁盘,状态仍为 **<font style="color:rgb(64, 64, 64);background-color:rgb(236, 236, 236);">UGood</font>**:
storcli64 /c0/e8/s5 show
# 输出:
# 8:5      11 UGood -  5.457 TB SAS  HDD N   N  512B ST6000NM0095     U
二、直接挂载磁盘(不创建 RAID 虚拟磁盘)
由于 RAID 卡不支持 JBOD 模式,且磁盘未绑定到任何虚拟磁盘,理论上操作系统应能直接识别为裸设备。请按以下步骤操作:
1. 强制操作系统识别磁盘
# 重新扫描 SCSI 总线
echo 1 > /sys/class/scsi_host/host*/scan
# 或使用工具
rescan-scsi-bus.sh -r

# 检查设备是否出现
lsblk
fdisk -l
- 期望输出:出现新设备(如
**<font style="color:rgb(64, 64, 64);background-color:rgb(236, 236, 236);">/dev/sdb</font>**)。
2. 检查磁盘分区和文件系统
# 查看分区表(如 /dev/sdb)
fdisk -l /dev/sdb

# 检查文件系统类型(如 ext4/xfs)
blkid /dev/sdb1  # 如果有分区
blkid /dev/sdb   # 如果无分区(直接使用整盘)
3. 挂载磁盘(只读模式优先)
mkdir /mnt/existing_data
mount -o ro /dev/sdb1 /mnt/existing_data  # 有分区的情况
# 或
mount -o ro /dev/sdb /mnt/existing_data   # 无分区的情况
若成功,检查数据:
三、若磁盘未被识别(仍无**** **<font style="color:rgb(64, 64, 64);background-color:rgb(236, 236, 236);">/dev/sdb</font>** ****设备)
1. 可能原因
- RAID 卡固件或驱动限制,未将未配置的磁盘暴露给操作系统。
- 磁盘本身存在硬件故障(尽管状态为
**<font style="color:rgb(64, 64, 64);background-color:rgb(236, 236, 236);">UGood</font>**)。
2. 解决方案
方案 1:创建单盘 RAID0(谨慎操作)
尽管有数据风险,但若磁盘原始数据是以单盘直接使用(无 RAID 元数据),创建单盘 RAID0 可能保留数据:
- bash复制下载
# 创建单盘 RAID0(警告:可能覆盖元数据!)
storcli64 /c0 add vd type=r0 drives=8:5

# 检查新虚拟磁盘
storcli64 /c0/vall show
- <font style="color:rgb(64, 64, 64);">若成功,虚拟磁盘将出现在输出中(如</font><font style="color:rgb(64, 64, 64);"> </font>`**<font style="color:rgb(64, 64, 64);background-color:rgb(236, 236, 236);">DG=5</font>**`<font style="color:rgb(64, 64, 64);">)。</font>
- <font style="color:rgb(64, 64, 64);">挂载新虚拟磁盘设备(如</font><font style="color:rgb(64, 64, 64);"> </font>`**<font style="color:rgb(64, 64, 64);background-color:rgb(236, 236, 236);">/dev/sdc</font>**`<font style="color:rgb(64, 64, 64);">)。</font>
- 方案 2:物理取出磁盘直连
将磁盘通过 SAS/SATA-USB 转接器 连接到其他 Linux 系统,绕过 RAID 卡直接挂载。
# 修复 xfs 文件系统
xfs_repair /dev/sdb1
最终使用了**创建单盘 RAID0**的方案解决。
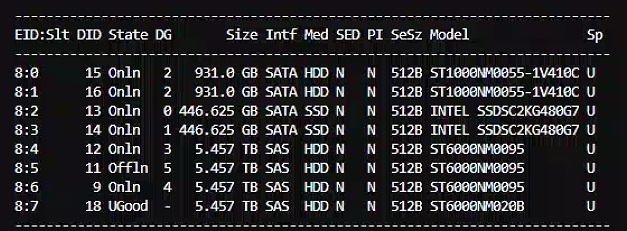
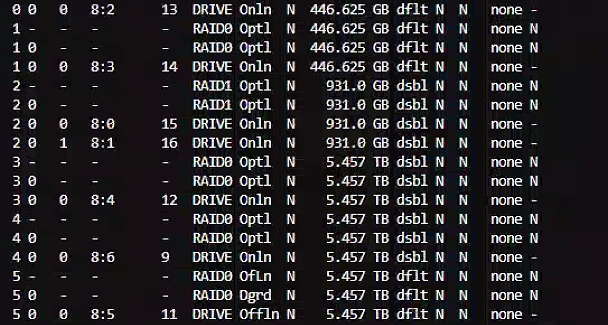
2025.5.22更换了新盘,发现www挂载目录的硬盘红灯又坏了:
操作记录:
先移除定时快照脚本:
#!/bin/bash

# 设置虚拟机名称
VM_NAME="debian12bt"
LOG_FILE="/var/log/vm_snapshot.log"

# 设置快照名称,包含当前日期时间
SNAPSHOT_NAME="${VM_NAME}_snapshot_$(date +%Y%m%d%H%M%S)"

# 当前时间戳
CURRENT_TIME=$(date +'%Y-%m-%d %H:%M:%S')

# 记录日志开始
echo "[$CURRENT_TIME] Starting snapshot creation for VM: $VM_NAME" >> $LOG_FILE

# 创建虚拟机快照
virsh snapshot-create-as --domain "$VM_NAME" --name "$SNAPSHOT_NAME" --description "Automated snapshot" --atomic

# 检查命令是否成功并记录结果
if [ $? -eq 0 ]; then
    echo "[$CURRENT_TIME] Snapshot '$SNAPSHOT_NAME' created successfully." >> $LOG_FILE
else
    echo "[$CURRENT_TIME] ERROR: Failed to create snapshot '$SNAPSHOT_NAME'." >> $LOG_FILE
    exit 1
fi

# 删除 30 天前的快照(可选)
echo "[$CURRENT_TIME] Cleaning up old snapshots..." >> $LOG_FILE
virsh snapshot-list --domain "$VM_NAME" --name | awk '{print \$1}' | while read SNAPSHOT; do
    SNAPSHOT_DATE=$(virsh snapshot-dumpxml --domain "$VM_NAME" "$SNAPSHOT" | grep "<created>" | sed 's/<created>//g' | sed 's/<\/created>//g')
    SNAPSHOT_TIMESTAMP=$(date -d "$SNAPSHOT_DATE" +%s)
    CURRENT_TIMESTAMP=$(date +%s)
    let "AGE=$((($CURRENT_TIMESTAMP - $SNAPSHOT_TIMESTAMP) / 86400))"
    if [ $AGE -gt 30 ]; then
        echo "[$CURRENT_TIME] Deleting snapshot: $SNAPSHOT (Age: $AGE days)" >> $LOG_FILE
        virsh snapshot-delete --domain "$VM_NAME" --snapshotname "$SNAPSHOT"
    fi
done
移除定时任务:
crontab -e
删除任务

*/30 * * * *  /www/server/cron/bb4cb2c1d819ac29ed3b0a86781727ae >> /www/server/cron/bb4cb2c1d819ac29ed3b0a86781727ae.log 2>&1
30 2 * * *  /www/server/cron/8872bd0e068d510d6c695b0553e45b2f >> /www/server/cron/8872bd0e068d510d6c695b0553e45b2f.log 2>&1
1 4 * * *  /www/server/cron/3ab48c27ec99cb9787749c362afae517 >> /www/server/cron/3ab48c27ec99cb9787749c362afae517.log 2>&1
0 1 * * * /usr/local/bin/snapshot_debian12bt.sh
检查磁盘分区和文件系统
sudo fdisk -l /dev/sdg
创建分区
sudo fdisk /dev/sdg
输入g,然后连续回车,最后输入w保存退出
创建文件系统,格式化分区(例如使用 ext4)
sudo mkfs.ext4 /dev/sdg1
挂载:
sudo mount /dev/sdg1 /bak
kvm虚拟快照删除后修复
由于中间快照文件(如 debian12.debian12bt_snapshot_20250107010001)已被删除,需强制将 debian12.new_base_snapshot 的依赖指向基础镜像 debian12.qcow2。
强制修复镜像
由于文件太大无法放在一个磁盘,因此将这两个文件分别放在/bak和/oldwww磁盘下操作:
强制重定向 backing file
sudo qemu-img rebase -u -b /bak/debian12.qcow2 /oldwww/debian12.new_base_snapshot
然后合并到基础镜像:
sudo qemu-img convert -O qcow2 /oldwww/debian12.new_base_snapshot /bak/debian12_merged_compressed.qcow2
验证合并后的镜像
qemu-img check debian12_merged.qcow2
输出应为 No errors found
启动虚拟机
先备份虚拟机配置
sudo virsh dumpxml debian12bt > /bak/backup.xml
原配置文件中的 虚拟机磁盘路径要改,以及快照也要删除:
<domain type='kvm'>
  <name>debian12bt</name>
  <uuid>49284ae5-e93e-42a6-9d55-b7109f9db347</uuid>
  <metadata>
    <libosinfo:libosinfo xmlns:libosinfo="http://libosinfo.org/xmlns/libvirt/domain/1.0">
      <libosinfo:os id="http://debian.org/debian/11"/>
    </libosinfo:libosinfo>
  </metadata>
  <memory unit='KiB'>16384000</memory>
  <currentMemory unit='KiB'>16384000</currentMemory>
  <vcpu placement='static'>24</vcpu>
  <os>
    <type arch='x86_64' machine='pc-q35-rhel8.2.0'>hvm</type>
    <boot dev='hd'/>
  </os>
  <features>
    <acpi/>
    <apic/>
    <vmport state='off'/>
  </features>
  <cpu mode='host-model' check='none'/>
  <clock offset='utc'>
    <timer name='rtc' tickpolicy='catchup'/>
    <timer name='pit' tickpolicy='delay'/>
    <timer name='hpet' present='no'/>
  </clock>
  <on_poweroff>destroy</on_poweroff>
  <on_reboot>restart</on_reboot>
  <on_crash>destroy</on_crash>
  <pm>
    <suspend-to-mem enabled='no'/>
    <suspend-to-disk enabled='no'/>
  </pm>
  <devices>
    <emulator>/usr/libexec/qemu-kvm</emulator>
    <disk type='file' device='disk'>
      <driver name='qemu' type='qcow2'/>
      <source file='/data/images/debian12.new_base_snapshot'/>
      <backingStore type='file'>
        <format type='qcow2'/>
        <source file='/data/images/debian12.debian12bt_snapshot_20250108010001'/>
        <backingStore type='file'>
          <format type='qcow2'/>
          <source file='/data/images/debian12.debian12bt_snapshot_20250107010001'/>
          <backingStore type='file'>
            <format type='qcow2'/>
            <source file='/data/images/debian12.debian12bt_snapshot_20250106010001'/>
            <backingStore type='file'>
              <format type='qcow2'/>
              <source file='/data/images/debian12.debian12bt_snapshot_20250105010001'/>
              <backingStore type='file'>
                <format type='qcow2'/>
                <source file='/data/images/debian12.debian12bt_snapshot_20250104010001'/>
                <backingStore type='file'>
                  <format type='qcow2'/>
                  <source file='/data/images/debian12.debian12bt_snapshot_20250103010001'/>
                  <backingStore type='file'>
                    <format type='qcow2'/>
                    <source file='/data/images/debian12.debian12bt_snapshot_20250102010001'/>
                    <backingStore type='file'>
                      <format type='qcow2'/>
                      <source file='/data/images/debian12.debian12bt_snapshot_20250101010001'/>
                      <backingStore type='file'>
                        <format type='qcow2'/>
                        <source file='/data/images/debian12.debian12bt_snapshot_20241231010001'/>
                        <backingStore type='file'>
                          <format type='qcow2'/>
                          <source file='/data/images/debian12.debian12bt_snapshot_20241230010001'/>
                          <backingStore type='file'>
                            <format type='qcow2'/>
                            <source file='/data/images/debian12.debian12bt_snapshot_20241229010002'/>
                            <backingStore type='file'>
                              <format type='qcow2'/>
                              <source file='/data/images/debian12.debian12bt_snapshot_20241228010001'/>
                              <backingStore type='file'>
                                <format type='qcow2'/>
                                <source file='/data/images/debian12.debian12bt_snapshot_20241227010001'/>
                                <backingStore type='file'>
                                  <format type='qcow2'/>
                                  <source file='/data/images/debian12.debian12bt_snapshot_20241226010001'/>
                                  <backingStore type='file'>
                                    <format type='qcow2'/>
                                    <source file='/data/images/debian12.debian12bt_snapshot_20241225010001'/>
                                    <backingStore type='file'>
                                      <format type='qcow2'/>
                                      <source file='/data/images/debian12.debian12bt_snapshot_20241224010001'/>
                                      <backingStore type='file'>
                                        <format type='qcow2'/>
                                        <source file='/data/images/debian12.debian12bt_snapshot_20241223010001'/>
                                        <backingStore type='file'>
                                          <format type='qcow2'/>
                                          <source file='/data/images/debian12.debian12bt_snapshot_20241222010001'/>
                                          <backingStore type='file'>
                                            <format type='qcow2'/>
                                            <source file='/data/images/debian12.debian12bt_snapshot_20241221010001'/>
                                            <backingStore type='file'>
                                              <format type='qcow2'/>
                                              <source file='/data/images/debian12.debian12bt_snapshot_20241220010001'/>
                                              <backingStore type='file'>
                                                <format type='qcow2'/>
                                                <source file='/data/images/debian12.debian12bt_snapshot_20241219010001'/>
                                                <backingStore type='file'>
                                                  <format type='qcow2'/>
                                                  <source file='/data/images/debian12.debian12bt_snapshot_20241218010001'/>
                                                  <backingStore type='file'>
                                                    <format type='qcow2'/>
                                                    <source file='/data/images/debian12.debian12bt_snapshot_20241217010001'/>
                                                    <backingStore type='file'>
                                                      <format type='qcow2'/>
                                                      <source file='/data/images/debian12.debian12bt_snapshot_20241216010001'/>
                                                      <backingStore type='file'>
                                                        <format type='qcow2'/>
                                                        <source file='/data/images/debian12.qcow2'/>
                                                      </backingStore>
                                                    </backingStore>
                                                  </backingStore>
                                                </backingStore>
                                              </backingStore>
                                            </backingStore>
                                          </backingStore>
                                        </backingStore>
                                      </backingStore>
                                    </backingStore>
                                  </backingStore>
                                </backingStore>
                              </backingStore>
                            </backingStore>
                          </backingStore>
                        </backingStore>
                      </backingStore>
                    </backingStore>
                  </backingStore>
                </backingStore>
              </backingStore>
            </backingStore>
          </backingStore>
        </backingStore>
      </backingStore>
      <target dev='vda' bus='virtio'/>
      <address type='pci' domain='0x0000' bus='0x04' slot='0x00' function='0x0'/>
    </disk>
    <disk type='file' device='cdrom'>
      <driver name='qemu' type='raw'/>
      <target dev='sda' bus='sata'/>
      <readonly/>
      <address type='drive' controller='0' bus='0' target='0' unit='0'/>
    </disk>
    <controller type='usb' index='0' model='qemu-xhci' ports='15'>
      <address type='pci' domain='0x0000' bus='0x02' slot='0x00' function='0x0'/>
    </controller>
    <controller type='sata' index='0'>
      <address type='pci' domain='0x0000' bus='0x00' slot='0x1f' function='0x2'/>
    </controller>
    <controller type='pci' index='0' model='pcie-root'/>
    <controller type='pci' index='1' model='pcie-root-port'>
      <model name='pcie-root-port'/>
      <target chassis='1' port='0x10'/>
      <address type='pci' domain='0x0000' bus='0x00' slot='0x02' function='0x0' multifunction='on'/>
    </controller>
    <controller type='pci' index='2' model='pcie-root-port'>
      <model name='pcie-root-port'/>
      <target chassis='2' port='0x11'/>
      <address type='pci' domain='0x0000' bus='0x00' slot='0x02' function='0x1'/>
    </controller>
    <controller type='pci' index='3' model='pcie-root-port'>
      <model name='pcie-root-port'/>
      <target chassis='3' port='0x12'/>
      <address type='pci' domain='0x0000' bus='0x00' slot='0x02' function='0x2'/>
    </controller>
    <controller type='pci' index='4' model='pcie-root-port'>
      <model name='pcie-root-port'/>
      <target chassis='4' port='0x13'/>
      <address type='pci' domain='0x0000' bus='0x00' slot='0x02' function='0x3'/>
    </controller>
    <controller type='pci' index='5' model='pcie-root-port'>
      <model name='pcie-root-port'/>
      <target chassis='5' port='0x14'/>
      <address type='pci' domain='0x0000' bus='0x00' slot='0x02' function='0x4'/>
    </controller>
    <controller type='pci' index='6' model='pcie-root-port'>
      <model name='pcie-root-port'/>
      <target chassis='6' port='0x15'/>
      <address type='pci' domain='0x0000' bus='0x00' slot='0x02' function='0x5'/>
    </controller>
    <controller type='pci' index='7' model='pcie-root-port'>
      <model name='pcie-root-port'/>
      <target chassis='7' port='0x16'/>
      <address type='pci' domain='0x0000' bus='0x00' slot='0x02' function='0x6'/>
    </controller>
    <controller type='virtio-serial' index='0'>
      <address type='pci' domain='0x0000' bus='0x03' slot='0x00' function='0x0'/>
    </controller>
    <interface type='network'>
      <mac address='52:54:00:bf:0c:21'/>
      <source network='default'/>
      <model type='virtio'/>
      <address type='pci' domain='0x0000' bus='0x01' slot='0x00' function='0x0'/>
    </interface>
    <interface type='network'>
      <mac address='52:54:00:8e:1f:4c'/>
      <source network='default'/>
      <model type='virtio'/>
      <address type='pci' domain='0x0000' bus='0x07' slot='0x00' function='0x0'/>
    </interface>
    <serial type='pty'>
      <target type='isa-serial' port='0'>
        <model name='isa-serial'/>
      </target>
    </serial>
    <console type='pty'>
      <target type='serial' port='0'/>
    </console>
    <channel type='unix'>
      <target type='virtio' name='org.qemu.guest_agent.0'/>
      <address type='virtio-serial' controller='0' bus='0' port='1'/>
    </channel>
    <channel type='spicevmc'>
      <target type='virtio' name='com.redhat.spice.0'/>
      <address type='virtio-serial' controller='0' bus='0' port='2'/>
    </channel>
    <input type='tablet' bus='usb'>
      <address type='usb' bus='0' port='1'/>
    </input>
    <input type='mouse' bus='ps2'/>
    <input type='keyboard' bus='ps2'/>
    <graphics type='spice' autoport='yes'>
      <listen type='address'/>
      <image compression='off'/>
    </graphics>
    <sound model='ich9'>
      <address type='pci' domain='0x0000' bus='0x00' slot='0x1b' function='0x0'/>
    </sound>
    <video>
      <model type='qxl' ram='65536' vram='65536' vgamem='16384' heads='1' primary='yes'/>
      <address type='pci' domain='0x0000' bus='0x00' slot='0x01' function='0x0'/>
    </video>
    <redirdev bus='usb' type='spicevmc'>
      <address type='usb' bus='0' port='2'/>
    </redirdev>
    <redirdev bus='usb' type='spicevmc'>
      <address type='usb' bus='0' port='3'/>
    </redirdev>
    <memballoon model='virtio'>
      <address type='pci' domain='0x0000' bus='0x05' slot='0x00' function='0x0'/>
    </memballoon>
    <rng model='virtio'>
      <backend model='random'>/dev/urandom</backend>
      <address type='pci' domain='0x0000' bus='0x06' slot='0x00' function='0x0'/>
    </rng>
  </devices>
</domain>
sudo virsh edit debian12bt

<disk type='file' device='disk'>
  <driver name='qemu' type='qcow2'/>
  <source file='/新路径/xxx.qcow2'/>  <!-- 修改此处路径 -->
  <target dev='vda' bus='virtio'/>
</disk>
找到 XML 中 **<font style="color:rgb(64, 64, 64);background-color:rgb(236, 236, 236);"><disk type='file' device='disk'></font>** 标签部分:
<disk type='file' device='disk'>
  <driver name='qemu' type='qcow2'/>
  <source file='/data/images/debian12.new_base_snapshot'/>
  <!-- 删除所有 <backingStore> 嵌套标签 -->
  <target dev='vda' bus='virtio'/>
  <address type='pci' domain='0x0000' bus='0x04' slot='0x00' function='0x0'/>
</disk>
删除所有 标签:
原配置中的多层嵌套快照链需要完全移除,最终只保留直接指向独立镜像的配置:
<disk type='file' device='disk'>
  <driver name='qemu' type='qcow2'/>
  <source file='/新路径/合并后的独立镜像.qcow2'/>  <!-- 修改为合并后的独立镜像路径 -->
  <target dev='vda' bus='virtio'/>
  <address type='pci' domain='0x0000' bus='0x04' slot='0x00' function='0x0'/>
</disk>
修改后的完整磁盘配置示例
<disk type='file' device='disk'>
  <driver name='qemu' type='qcow2'/>
  <source file='/data/images/debian12_merged_compressed.qcow2'/> <!-- 替换为你的合并后文件路径 -->
  <target dev='vda' bus='virtio'/>
  <address type='pci' domain='0x0000' bus='0x04' slot='0x00' function='0x0'/>
</disk>
重新定义虚拟机
sudo virsh define /etc/libvirt/qemu/debian12bt.xml
启动虚拟机
sudo virsh start debian12bt
确认 debian12_merged.qcow2 可用后,清理旧文件
sudo rm -f /data/images/debian12.new_base_snapshot
温馨提示
知识产权声明:本软件已获国家版权局软件著作权登记(登记号:2022SR0558725),受《计算机软件保护条例》保护。未经书面授权,严禁对本软件进行反向工程、反编译、破解或任何形式的篡改。侵权必究。
官方指引:本文档为官方安装部署说明,仅适用于当前发布版本,后续版本请以最新官方文档为准。
环境要求:安装前请确认操作系统版本、运行环境(如 .NET、Java 等)及硬件配置满足软件运行要求,避免因环境不兼容导致异常。
操作风险与免责:安装配置涉及防火墙、注册表或环境变量等系统级变更,建议由具备相关经验的技术人员操作。因用户未严格遵循本官方指引或操作不当导致的任何数据丢失、系统异常或其他损失,我方不承担相关责任。如遇问题,请及时联系技术支持。
反馈渠道:如有未覆盖的问题,欢迎通过客服反馈,我们将持续更新与改进。
版本记录:最后更新于 2026-08-07